7 t-tests
7.1 Intro
In the early 1900s, William Sealy Gosset joined Guinness, then the world’s largest brewery. Guinness hired scientifically trained brewers and gave them latitude to pursue research that improved the product. As production scaled, quality control mattered: a pint should taste the same in Dublin as in Detroit. Until then, hop quality was judged mostly by appearance and smell, which was unreliable. Chemical assays could measure ingredients, but the core problem was statistical. Inference relied on the normal (Z) distribution, which works well when samples are large enough for a normal approximation. In practice, Guinness could not destroy large volumes of beer or ingredients just to test them.
Gosset set out to quantify the extra uncertainty introduced by small samples. How much wider is the error around an estimate when \(n=10\) instead of \(n=1000\)? He derived a new sampling distribution that accounts for small-sample variability, now known as the Student’s (t) distribution. Because Guinness restricted external publications, he published the 1908 paper under the pseudonym “Student” (Student 1908). That is why we still say Student’s \(t\)-test. The core idea you will use today is the same: measure a signal, scale it by its standard error, and compare the resulting \(t\) to the appropriate \(t\) distribution for your \(n-1\) degrees of freedom.
Why this matters. We often compare a sample mean to a reference (drinking-water standard, historical average) or compare two conditions (before/after, site A vs site B). A t-test asks whether the observed difference is larger than you would expect from sampling variation alone, given your \(n\) and variability.
Three common t-tests you will use.
- One-sample t-test. Compare a sample mean to a target (\(\mu_0\)).
- Paired t-test. Compare before/after (or matched) measurements on the same units by running a one-sample t on the differences.
- Independent-samples t-test (also called two-sample t-test) Compare means from two groups measured on different units. Use Welch’s test by default when variances differ.
What you will report.
Always report:
- the effect size (mean difference)
- a 95% CI, the test statistic with df
- and the \(p\)-value.
Example: “Mean change was (-0.42) units (95% CI [-0.73,-0.11] ;t(11)=-2.92; p=0.014).”
7.2 From mean & SD to “signal over noise”
A mean tells you where the center is; the SD tells you how spread out the data are. A mean of 50 could be very representative (if SD is tiny) or nearly meaningless (if SD is huge). You need both.
A simple way to combine them is a ratio:
\[ \frac{\text{mean}}{\text{SD}} \]
Big numerator, small denominator → big ratio (more confidence that the mean reflects the data).
Small numerator or big denominator → small ratio (less confidence).
For instance, mean = 50 with SD = 1 gives 50; mean = 50 with SD = 100 gives 0.5. Same mean, very different stories.
This “signal over noise” pattern shows up everywhere in inference. In general,
\[ \text{statistic}=\frac{\text{effect}}{\text{error}}. \]
For \(t\)-tests, we won’t actually use SD in the denominator, we use the standard error \(SE\), which is the SD of the sample mean. But the logic is the same: measure a signal, scale it by its uncertainty, and see whether the resulting ratio is unusually large or small under the right \(t\) distribution.
\[ t = \frac{\text{effect}}{\text{standard error}} = \frac{\bar{X} - \mu_0}{s / \sqrt{n}} \]
We now turn that ratio into a test statistic for a single mean.
7.3 One-sample t-test
Use a one-sample \(t\) when you want to test whether a sample mean differs from a reference value (\(\mu_0\)). The question: is the observed difference bigger than you’d expect from sampling variability, given \(n\) and your sample SD \(s\)?
\[ t = \frac{\bar{X}-\mu_0}{s/\sqrt{n}}, \qquad df = n-1 \]
After calculating \(t\) from our data, we compare the observed \(t\) to a \(t\) distribution with \(n-1\) degrees of freedom to get a \(p\)-value and a decision at \(\alpha\).
7.3.1 Comparing \(z\) and \(t\)
When the population SD is known (or we have a large enough sample to assume convergence), the ratio is called \(z\); when it’s estimated from the data, it’s \(t\).
Under a known population SD (\(\sigma\)), the standardized mean uses the \(z\) statistic: \[ z = \frac{\bar{X}-\mu_0}{\sigma/\sqrt{n}} \]
When \(\sigma\) is unknown (the usual case), we estimate it with the sample SD (\(s\)) and use the \(t\) statistic: \[ t = \frac{\bar{X}-\mu_0}{s/\sqrt{n}}, \qquad df = n-1 \]
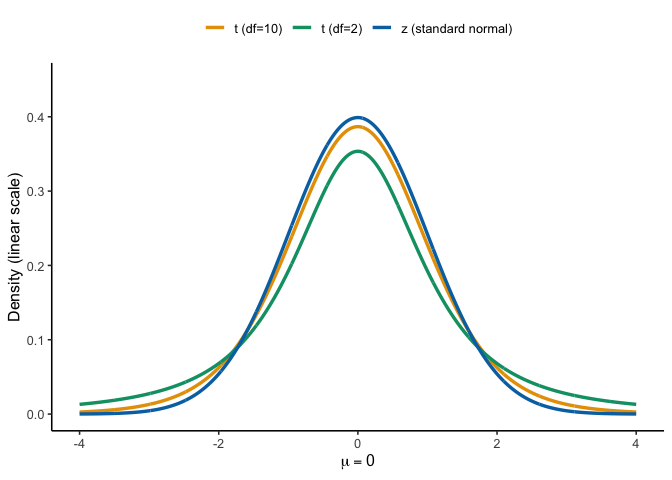
Because \(s\) varies from sample to sample, the \(t\) distribution has heavier tails than the standard normal. As \(n\) grows, \(s\) stabilizes and \(t\) converges to \(z\).
Note
When is \(z\) appropriate? If the population SD \(\sigma\) is known and the sampling distribution of the mean is (approximately) normal, use \(z\). In practice, \(\sigma\) is rarely known, so we use \(t\) with \(s\) and \(df=n-1\).
Rule of thumb. For two-tailed tests at \(\alpha=0.05\):
- \(z\) uses critical values \(\pm 1.96\).
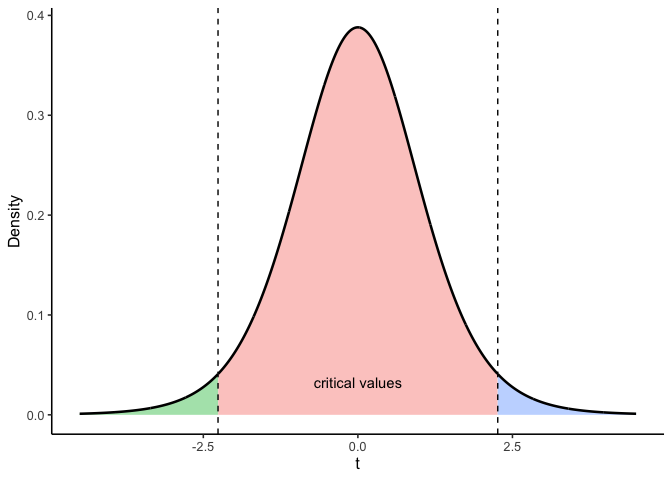
- \(t\) is a bit wider for small \(n\) (e.g., \(df=9 \Rightarrow \pm 2.262\); \(df=29 \Rightarrow \pm 2.045\)), and approaches \(\pm 1.96\) as \(n\) increases.
7.3.2 What t represents
Either way, the ratio asks the same question: how far is the mean from the reference in SE units?
\(t\) expresses how far a sample mean is from the hypothesized mean, in standard error units (signal over noise):
\[ t = \frac{\bar{X}-\mu_0}{s/\sqrt{n}} \]
\(t\) can be positive or negative depending on direction. Under \(H_0\), \(t \sim t_{(df=n-1)}\).
Rule of thumb: at \(\alpha=.05\) two-tailed, \(|t|\gtrsim 2\) is uncommon when \(df\approx 20\).
Note
Remember, \(s/\sqrt{n}\) is the standard error (SE)—the standard deviation of the sampling distribution of the mean.
Let’s see how \(t\) values behave when samples really come from the null hypothesis. Under the null hypothesis, \(t\) follows a \(t\) distribution with \(df = n-1\).
Large \(|t|\) values are rare; with \(df \approx 20\), \(|t| \gtrsim 2\) is uncommon at \(\alpha = .05\) (two-tailed).
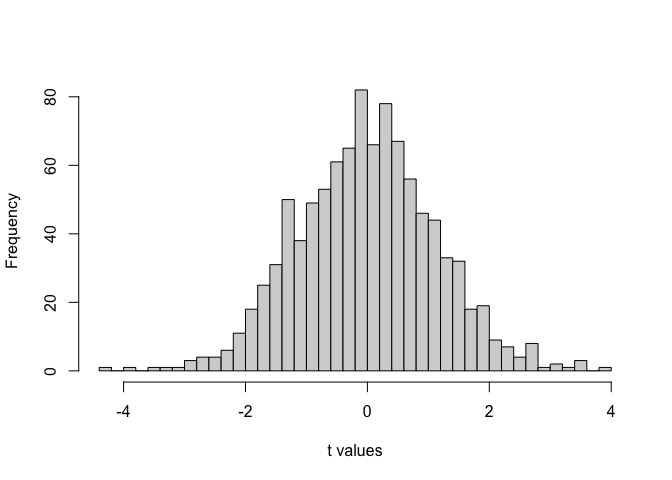
Takeaway: \(t\) measures how far the sample mean is from the null expectation, scaled by its uncertainty. It behaves predictably under \(H_0\), allowing us to decide whether a difference is likely due to chance.
7.3.3 Calculating t from data
Let’s calculate a one-sample \(t\) statistic step by step using a short example. Ten students each took a 5-question true/false quiz (50% expected by chance). Their scores (percent correct) are:
Scores: 50, 70, 60, 40, 80, 30, 90, 60, 70, 60
By hand, the standard error of the mean is the sample SD divided by the square root of \(n\):
\[ \text{SEM} = \frac{s}{\sqrt{n}} = \frac{17.92}{\sqrt{10}} = 5.67 \]
And \(t\) is the difference between the sample mean (61) and the reference value (50, chance level), divided by that SEM:
\[ t = \frac{\bar{X}-\mu_0}{SEM} = \frac{61-50}{5.67} = 1.94 \]
We can confirm this with a single R command, t.test(scores, mu = 50):
Results: \(t(9)=1.94\), \(p=0.0842\); mean \(=61\) (95% CI [48.18, 73.82]).
Interpretation: The mean (61%) is above chance (50%), but the difference is not statistically significant at \(\alpha=.05\).
Assumptions check: Observations are independent, and with \(n=10\) the data are approximately normal, sufficient for a one-sample \(t\)-test.
7.3.4 Assumptions, and what to do when they don’t hold
Every test in this book rests on assumptions. Assumptions are conditions that need to be roughly true for the math behind the test to be trustworthy. There are two different kinds of assumptions.
The universal assumption. Every single test we cover in this class (one-sample \(t\), paired \(t\), independent \(t\), ANOVA, regression) assumes your observations are independent and came from a sound study design (a fair sample, not one that systematically favors certain values). This assumption is so constant that from here on, we won’t re-list it test by test. Keep it in the back of your mind, but if an exam or homework question asks you to “list the assumptions of this test,” this isn’t the answer they’re looking for.
Test-specific assumptions. These come from how a particular test’s math actually works, and they differ test to test. For the one-sample and paired \(t\)-tests, the specific assumption is approximate normality of the outcome itself (one-sample) or of the difference scores (paired). Why does this matter? The \(t\)-distribution we’ve been using to get \(p\)-values is derived assuming the sampling distribution of the mean is normal. If your data are badly skewed and your sample is small, that derivation is on shaky ground, and the \(p\)-value it hands you may not mean what it claims to mean.
How worried should you be? It depends enormously on \(n\). With a large sample, the Central Limit Theorem does a lot of the work for you. The sampling distribution of the mean tends toward normal even when individual observations are skewed, so the \(t\)-test is fairly robust to non-normality once \(n\) is reasonably large. A lot of environmental data, particularly field data, instead is from small samples that are also skewed. Examples include a handful of expensive water samples, a short list of monitoring wells, five plots you had time to visit before the storm rolled in. Small \(n\) and non-normality reinforcing each other is when a \(t\)-test’s answer becomes questionable.
What to do about it. First, look at your data. A histogram or a QQ-plot will usually tell you whether “approximately normal” is a reasonable description or a stretch. You can also run a formal normality test, the Shapiro-Wilk test (shapiro.test() in R), which tests \(H_0\): the data came from a normal distribution. Treat it as one more piece of evidence rather than a strict gate though: with a small sample, exactly when a violation matters most, it has low power and will often say “no problem” even when there is one. If your data look like a stretch and your sample is small, you have another option: a nonparametric test that doesn’t lean on the normality assumption at all. You’ll meet these nonparametric alternatives in the next chapter, once we’ve covered all three t-test forms below.
7.3.5 How does t behave?
Under the null hypothesis (\(H_0\) true), \(t\) follows a t distribution with degrees of freedom \(df = n - 1\). Large \(|t|\) values are rare; extreme sample means are unlikely if \(H_0\) is true.
For moderate sample sizes (\(df \approx 20\)), a simple rule of thumb is:
In a two-tailed test at \(\alpha = .05\), \(|t| \gtrsim 2\) is uncommon.
This means values of \(t\) beyond roughly \(-2\) or \(+2\) occur less than 5% of the time under the null. That’s the foundation of the decision rule for \(t\) tests: if your observed \(t\) lies in those rare tails, you reject \(H_0\).
Remember, if we obtained a single \(t\) from one sample we collected, we could consult the chance window in Figure 7.3 below to find out whether the \(t\) we obtained from the sample was likely or unlikely to occur by chance.
7.3.6 Interpreting \(t\)
We’re asking whether our sample could plausibly have come from the null distribution: the distribution of \(t\)-values we’d see across many samples of size 10, if the true mean were exactly 50 (chance level). Figure 7.4 shows what that distribution looks like, at \(df=9\).
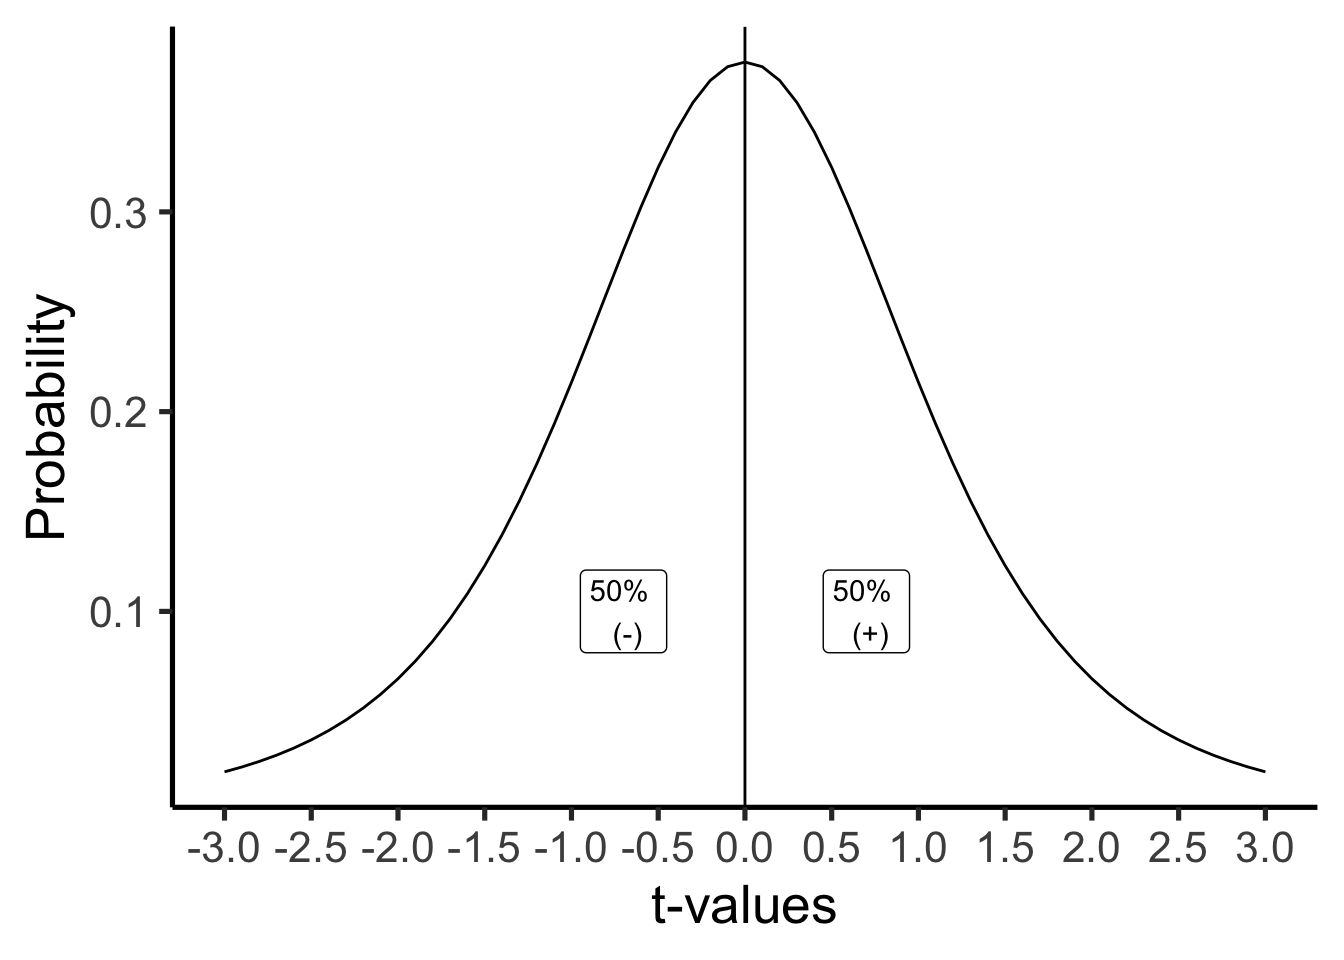
\(t\) is most likely to land near zero, which makes sense: this is the distribution of no differences, so most of the time chance alone won’t push it far from 0. Because the distribution is symmetric, a \(t\)-value from the null distribution is just as likely to be positive as negative.
That symmetry gives us a few basic probabilities for free:
- \(t\) is always zero, positive, or negative, so \(p(t=0 \text{ or } t>0 \text{ or } t<0) = 1\).
- \(p(t \geq 0) = .5\): half of all \(t\)-values are zero or greater.
- \(p(t \leq 0) = .5\): half are zero or smaller.
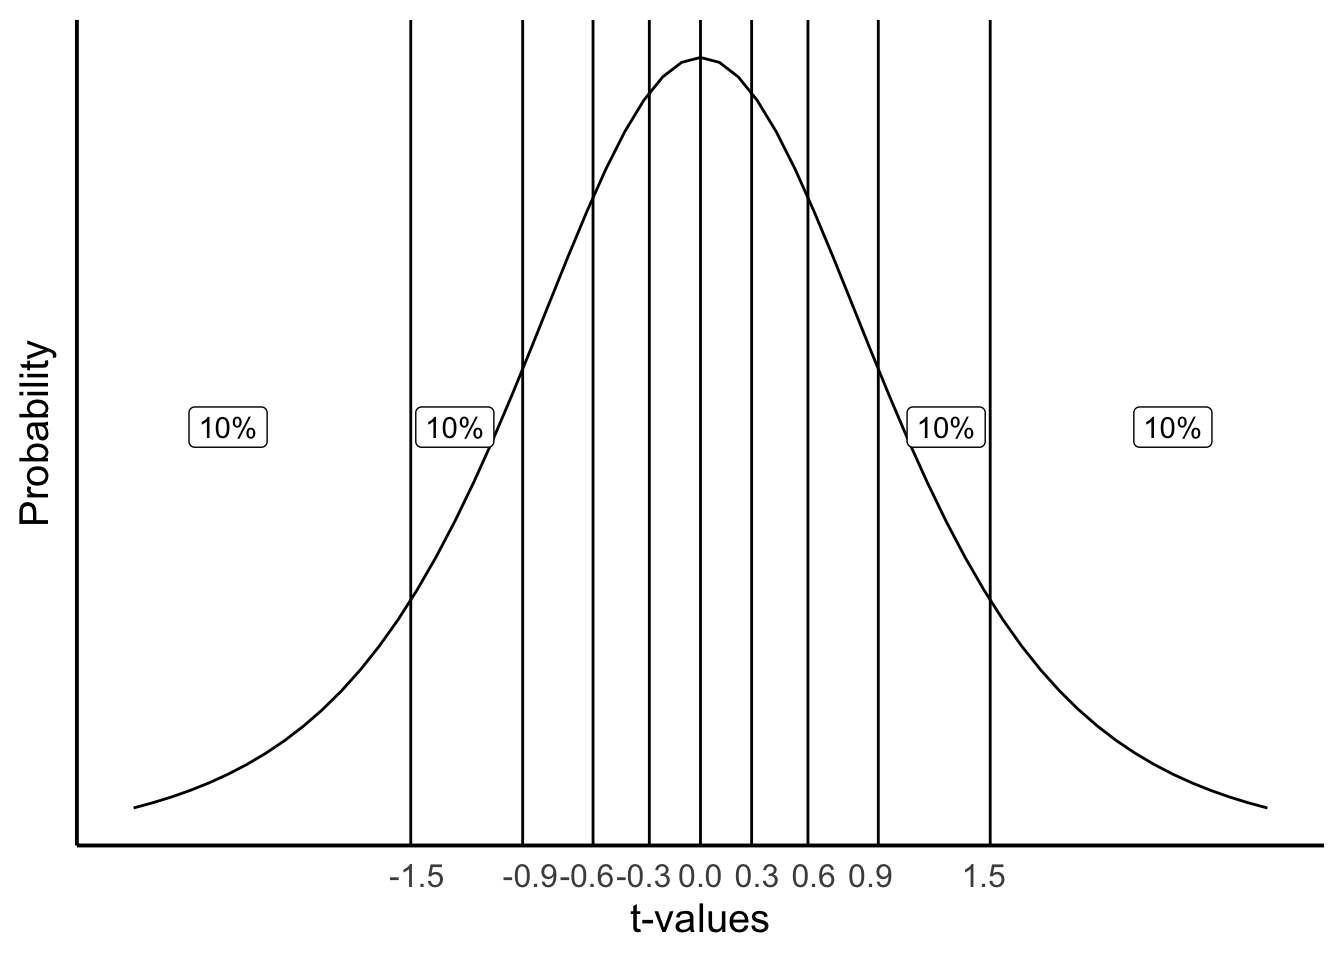
We can get more precise than a 50/50 split. Figure 7.5 divides the same distribution into ten regions, each containing 10% of the distribution. Notice the regions get wider out in the tails: since most \(t\)-values cluster near 0, it takes a wider interval out there to capture the same 10%.
For example:
- \(t \leq -1.38\): \(p = 10\%\)
- \(-1.38 \leq t \leq -0.88\): \(p = 10\%\)
- \(-0.88 \leq t \leq -0.54\): \(p = 10\%\)
- \(t \geq 1.38\): \(p = 10\%\)
Each range captures the same 10% of the distribution, even though the ranges themselves are different widths.
7.3.7 Getting the p-values for \(t\)-values
Where do values like these actually come from? Older textbooks put a table in the back of the book; this one doesn’t need one, because software gives you exact \(t\) and \(p\) values directly. R, Excel, and online calculators all work; you’ll get hands-on practice with this in lab, both with software and by simulation.
Software does need a couple of things from you to compute a \(p\)-value correctly: the degrees of freedom, and whether the test is one-tailed or two-tailed. We haven’t covered either yet, so that’s next, starting with one-tailed tests, then two-tailed, then degrees of freedom.
7.3.8 One-tailed vs. two-tailed, applied
Chapter 6 introduced the concept: a two-tailed test asks whether \(\mu\) differs from \(\mu_0\) in either direction, while a one-tailed test commits to one direction in advance, and is only justified when your theory already rules out the other direction. Here’s how that choice plays out mechanically for a \(t\)-test: it changes the critical value, and therefore the \(p\)-value, for the exact same data.
For our quiz-score example (\(df=9\)), a one-tailed test only needs to clear 5% of the distribution on one side. A two-tailed test has to clear 2.5% on each side, which pushes the critical value farther out:
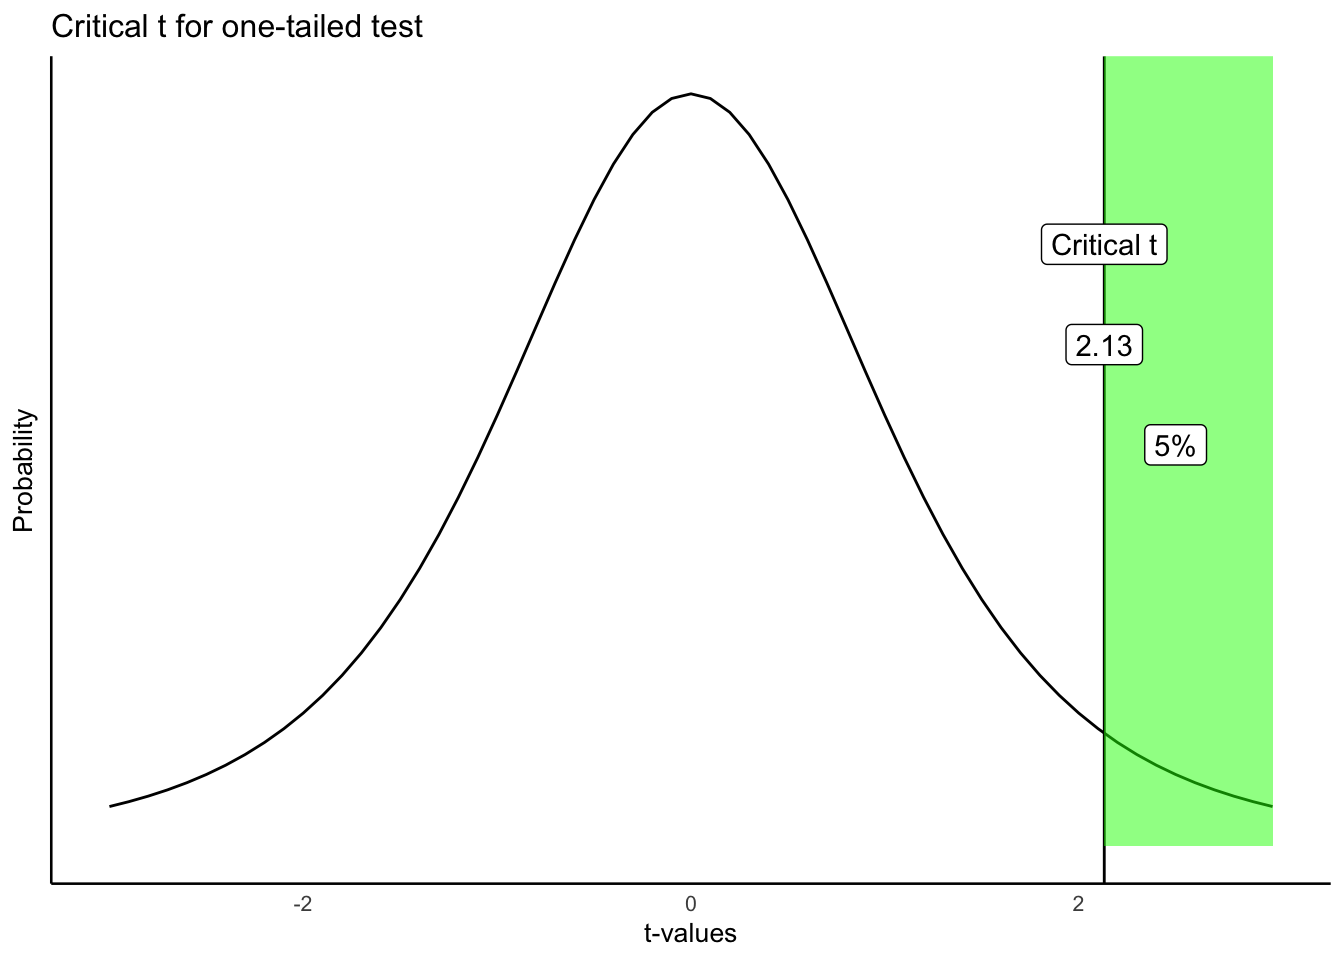
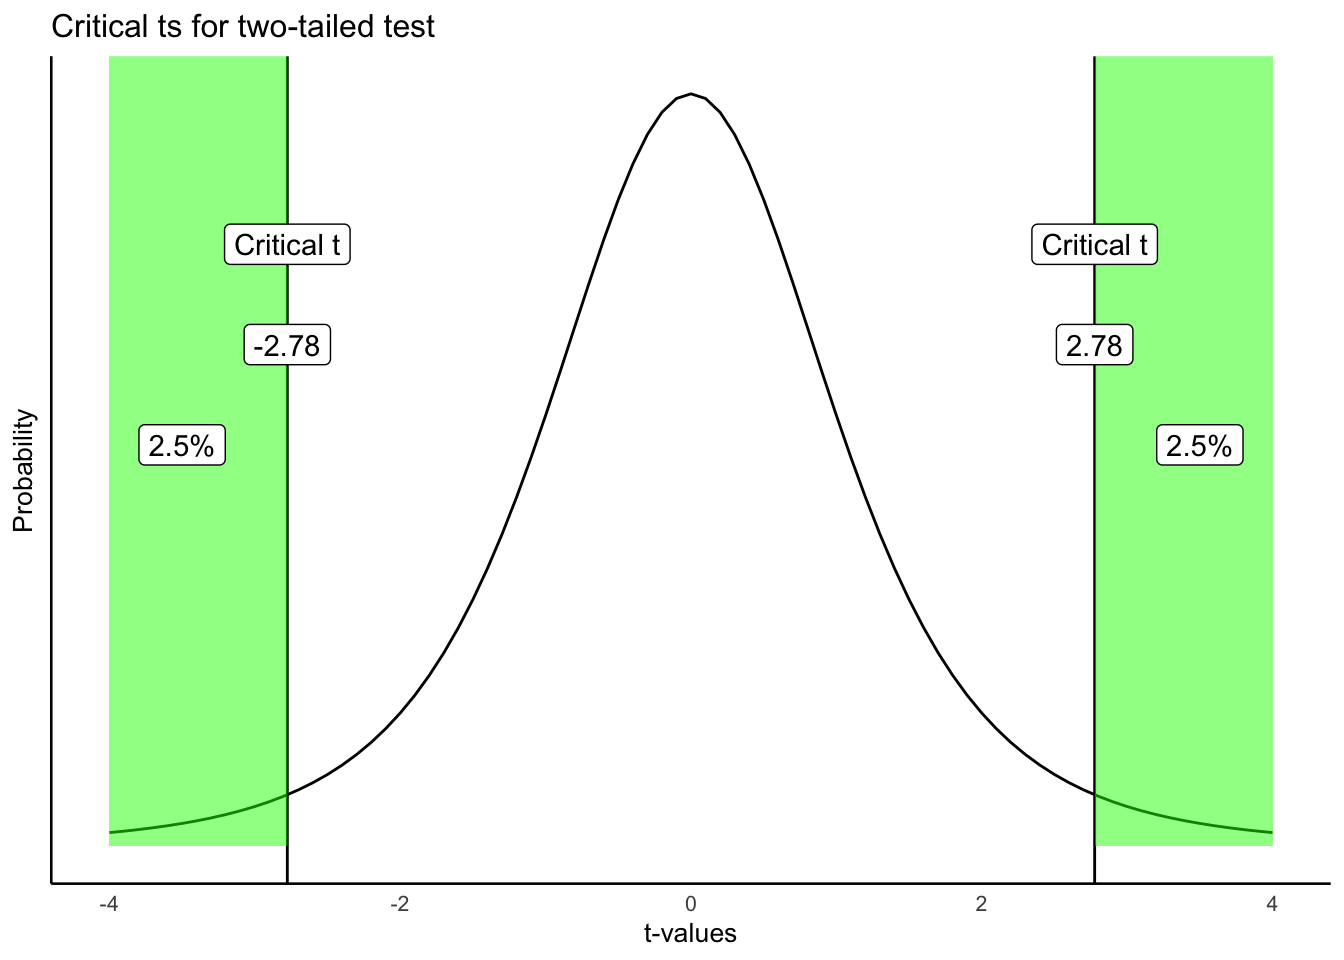
Applied to our actual result, \(t(9) = 1.94\): the one-tailed \(p\) is .042, the two-tailed \(p\) is .084, exactly double, since a two-tailed test counts the matching extreme region on both sides instead of just one. Here the choice actually changes the decision: one-tailed, this result is significant at \(\alpha=.05\); two-tailed, it isn’t. That’s exactly why a one-tailed test has to be justified by your theory before you see the data, not chosen afterward because it gives the answer you wanted.
7.3.9 Which one should you use?
Use a one-tailed test only when your theory already rules out the opposite direction; default to two-tailed otherwise (Chapter 6’s rule). There’s a second reason two-tailed is the safer default: a one-tailed critical value is always closer to 0 than a two-tailed one, so routinely running one-tailed tests inflates your long-run Type I error rate above your stated \(\alpha\) (recall from Chapter 6: a Type I error means rejecting \(H_0\) when it’s actually true). That’s why most researchers default to two-tailed tests even when they do have a directional prediction, and why it’s worth being able to justify your choice rather than picking whichever gives the smaller \(p\)-value.
7.3.10 Degrees of freedom
You’ve probably noticed a number in parentheses every time we report a \(t\)-test, like \(t(9) = 1.94\). That’s the degrees of freedom, and it’s worth understanding what it means, not just where to find it.
For one-sample and paired \(t\)-tests, \(df = n-1\). In our quiz example, \(n=10\) students, so \(df=9\).
Degrees of freedom is both a concept and a correction. The concept: once you’ve estimated something from your data, like the mean, that estimate constrains how many of the numbers are still free to vary. Consider three numbers with a mean of 2: pick the first two freely, say 51 and \(-3\), and the third number is no longer free. It has to be \(-42\) for the mean to come out to 2. Two of the three numbers had freedom; the third didn’t. That’s \(df=n-1=2\) for three numbers.
The same logic applies to the sample standard deviation. Computing it requires the sample mean first, which uses up one degree of freedom, exactly why the sample SD divides by \(n-1\) rather than \(n\) (Chapter 2).
7.3.10.1 Simulating how degrees of freedom affects the \(t\) distribution
We can see the effect of degrees of freedom directly by simulating the \(t\) distribution at two different sample sizes. Figure 7.8 compares \(df=9\) (our quiz-score example) to \(df=100\) (a much larger sample).
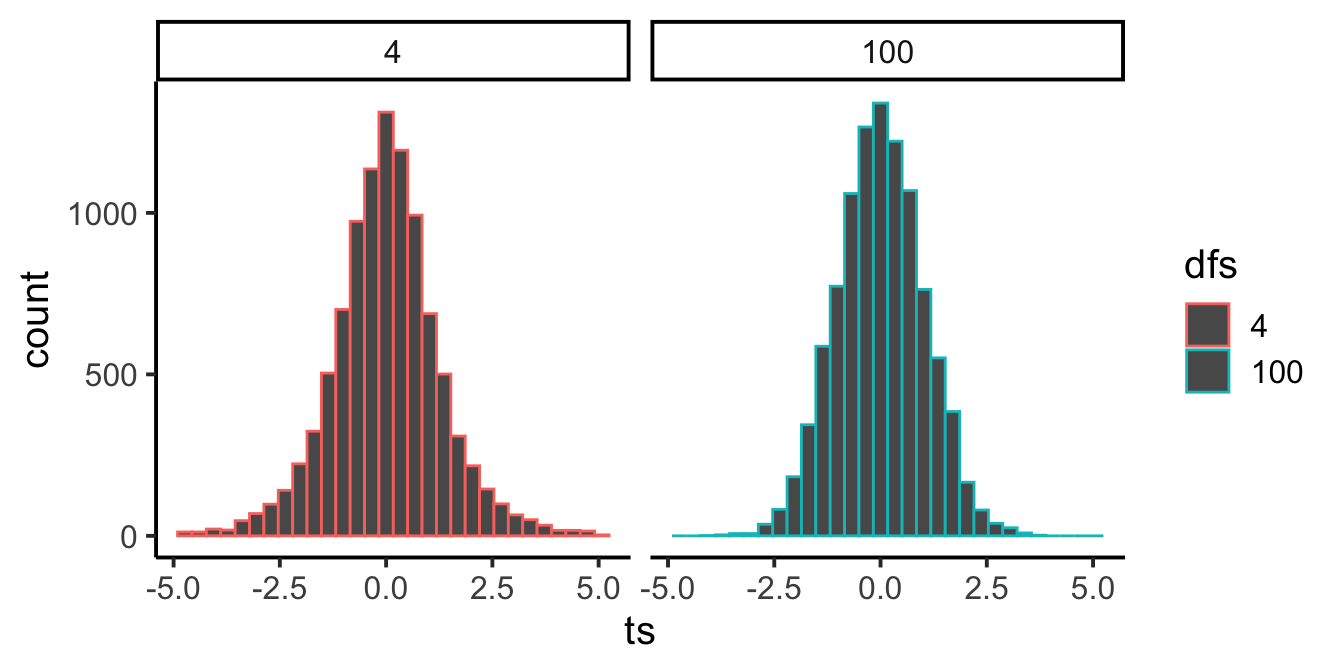
As degrees of freedom increase, the \(t\) distribution gets taller in the middle and narrower in the tails, converging toward the standard normal. That’s the same pattern from “Comparing \(z\) and \(t\)” earlier: with more data, the sample SD becomes a more reliable estimate of the population SD, so \(t\) behaves more like \(z\).
Why \(n-1\) and not \(n\)? Because \(t\) uses the sample SD to estimate the standard error, and that SD calculation already spent one degree of freedom estimating the mean, so the \(t\)-distribution is built assuming \(n-1\) from the start.
7.4 Paired t: before/after or matched
When the same units are measured twice (before/after, matched pairs), the question is whether they changed. The natural data unit is the within-unit difference.
Design in this worked example. Ecologists measured soil moisture (%) at 20 paired field plots before and after wetland restoration. Each plot was measured twice — once during the dry season before restoration work began, and again one year later. We care whether restoration increased soil moisture, which would support plant reestablishment and carbon sequestration.
Define differences and their meaning. Choose an order and stick to it:
- \(d_i = \text{After}_i - \text{Before}_i\)
- \(d_i>0\): plot had more soil moisture after restoration (increase)
- \(d_i<0\): plot had less soil moisture after restoration (decrease)
This subtraction cancels between-plot variability (some plots are naturally wetter than others) and focuses on within-plot change.
Test on differences (paired (t)). Compute one difference per plot, then run a one-sample \(t\) against 0:
\[ \bar d=\frac{1}{n}\sum_{i=1}^n d_i, \quad s_d=\text{SD}(d_1,\ldots,d_n), \quad t = \frac{\bar d - 0}{s_d/\sqrt{n}}, \quad df=n-1. \]
The sign of \(t\) matches \(\bar d\) and your difference direction.
Mini walk-through (first 5 plots). Using the first five plots, \(\bar d = 2.8\) and \(s_d = 3.42\). Then \[ t=\frac{2.8}{3.42/\sqrt{5}} \approx 1.83,\qquad df=4, \] which (two-tailed) is not significant. That’s expected with \(n=5\).
Full sample effect. With all 20 plots, \(\bar d\) is similar but \(s_d/\sqrt{n}\) gets smaller, so \(t\) increases and the result becomes significant. This is the payoff of pairing: more power from the same number of plots.
What to report. \(\bar d\) (the mean change), a 95% CI, \(t(df)\), and \(p\). Optionally add a standardized effect (Cohen’s \(d=\bar d/s_d\)).
R pointers (you’ll do this in lab).
- Compute differences:
d <- after - before - Paired \(t\):
t.test(d, mu = 0)ort.test(after, before, paired = TRUE) - CI for \(\bar d\): from the
t.testoutput
7.4.1 Calculate t
How do we calculate \(t\) for a paired-samples \(t\)-test? We use the exact same one-sample \(t\)-test formula from the previous section, just applied to the difference scores instead of raw scores. The paired-samples \(t\)-test is really just a variation on the one-sample \(t\)-test: there’s still only one group of numbers involved, the differences.
Let’s find \(t\) for the mean difference scores:
| plot | Before | After | differences | diff_from_mean | Squared_differences |
|---|---|---|---|---|---|
| 1 | 18 | 21 | 3 | 0.2 | 0.0400000000000001 |
| 2 | 22 | 26 | 4 | 1.2 | 1.44 |
| 3 | 16 | 22 | 6 | 3.2 | 10.24 |
| 4 | 25 | 29 | 4 | 1.2 | 1.44 |
| 5 | 21 | 18 | -3 | -5.8 | 33.64 |
| Sums | 102 | 116 | 14 | 0 | 46.8 |
| Means | 20.4 | 23.2 | 2.8 | 0 | 9.36 |
| sd | 3.421 | ||||
| SEM | 1.53 | ||||
| t | 1.83006535947712 |
If we did this test using R, we would obtain almost the same numbers (there is a little bit of rounding in the table).
| Mean difference | t | df | p-value |
|---|---|---|---|
| 2.8 | 1.83 | 4 | 0.141 |
Our t-test results are: t(4) = 1.83, p = .141.
The sign of \(t\) matches the sign of the mean difference (ours was \(+2.8\) percentage points), so soil moisture increased on average, exactly what \(\bar d\) already told us directly. Getting a \(p\)-value from this \(t\), and choosing one-tailed vs. two-tailed, works exactly like it did for the one-sample case (see the One-sample \(t\)-test section above). Two-tailed, \(p=.141\): not significant, this five-plot sample is too small to rule out chance.
7.4.2 Scaling to the full sample
The five plots above are a subset of the full restoration study, which measured all 20 paired plots. With only \(n=5\), \(t(4)=1.83\) wasn’t enough to distinguish the observed increase from chance (\(p=.141\)). Here’s what changes with the full sample.
| Mean difference | t | df | p-value |
|---|---|---|---|
| 1.9 | 2.5 | 19 | 0.022 |
At \(n=20\), \(t(19) = 2.5\), \(p = 0.022\): significant. The mean difference (1.9 percentage points) is in the same range as what the 5-plot subset already suggested; what changed is the standard error, which shrank enough with the larger sample to rule out chance. This is the payoff of pairing: same design, more plots, more power to detect a real effect.
7.5 Two independent groups
The independent-samples \(t\)-test is the third and last design in this chapter. The logic is the same as the one-sample and paired cases: a mean difference divided by an estimate of its variability. What changes is the research design.
Use an independent-samples \(t\)-test for a between-subjects design: different people or units in each condition, each measured once. With two groups of 10, that’s 20 people total, none of them paired. Without repeated measures on the same unit, there’s no meaningful way to subtract scores between conditions the way the paired \(t\)-test does.
The numerator works the same way it always has: the mean difference between groups. The denominator is where independent groups differ from the paired case, since now we need a single estimate of variability built from two separate samples instead of one.
A natural first guess is to average the two groups’ standard errors:
\[ t = \frac{\bar{A}-\bar{B}}{\left(\dfrac{SEM_A+SEM_B}{2}\right)} \]
That average, however, is a biased estimator of the variability under the null. Instead, the independent-samples \(t\)-test pools the two groups’ variances, weighted by their degrees of freedom, into a single estimate for the denominator:
\[ t = \frac{\bar{X}_A-\bar{X}_B}{s_p\sqrt{\dfrac{1}{n_A}+\dfrac{1}{n_B}}} \]
where the pooled standard deviation \(s_p\) is (note \(s_A^2\) and \(s_B^2\) here are variances, not standard deviations):
\[ s_p = \sqrt{\frac{(n_A-1)s_A^2 + (n_B-1)s_B^2}{n_A+n_B-2}} \]
The example below computes \(t\) for two small groups by following that formula step by step in R, then checks it against t.test().
## By "hand" using R
a <- c(1,2,3,4,5)
b <- c(3,5,4,7,9)

mean_difference <- mean(a)-mean(b) # compute mean difference

variance_a <- var(a) # compute variance for A
variance_b <- var(b) # compute variance for B

# Compute top part and bottom part of sp formula

sp_numerator <- (4*variance_a + 4* variance_b)
sp_denominator <- 5+5-2
sp <- sqrt(sp_numerator/sp_denominator) # compute sp


# compute t following the formula

t <- mean_difference / ( sp * sqrt( (1/5) +(1/5) ) )

t # print results
#> [1] -2.017991


# using the R function t.test
t.test(a,b, paired=FALSE, var.equal = TRUE)
#>
#>  Two Sample t-test
#>
#> data:  a and b
#> t = -2.018, df = 8, p-value = 0.0783
#> alternative hypothesis: true difference in means is not equal to 0
#> 95 percent confidence interval:
#>  -5.5710785  0.3710785
#> sample estimates:
#> mean of x mean of y
#>       3.0       5.6
7.6 Simulating data for t-tests
An “advanced” topic for \(t\)-tests is the idea of using R to conduct simulations for \(t\)-tests.
If you recall, \(t\) is a property of a sample. We calculate \(t\) from our sample. The \(t\) distribution is the hypothetical behavior of our sample. That is, if we had taken thousands upon thousands of samples, and calculated \(t\) for each one, and then looked at the distribution of those \(t\)’s, we would have the sampling distribution of \(t\)!
It can be very useful to get in the habit of using R to simulate data under certain conditions, to see how your sample data, and things like \(t\) behave. Why is this useful? It mainly prepares you with some intuitions about how sampling error (random chance) can influence your results, given specific parameters of your design, such as sample-size, the size of the mean difference you expect to find in your data, and the amount of variation you might find. These methods can be used formally to conduct power-analyses. Or more informally for data sense.
7.6.1 Simulating a one-sample t-test
Here are the steps you might follow to simulate data for a one sample \(t\)-test.
Make some assumptions about what your sample (that you might be planning to collect) might look like. For example, you might be planning to collect 30 subjects worth of data. The scores of those data points might come from a normal distribution (mean = 50, sd = 10).
sample simulated numbers from the distribution, then conduct a \(t\)-test on the simulated numbers. Save the statistics you want (such as \(t\)s and \(p\)s), and then see how things behave.
Let’s do this a couple different times. First, let’s simulate samples with N = 30, taken from a normal (mean= 50, sd = 25). We’ll do a simulation with 1000 simulations. For each simulation, we will compare the sample mean with a population mean of 50. There should be no difference on average here. Figure 7.9 is the null distribution that we are simulating.
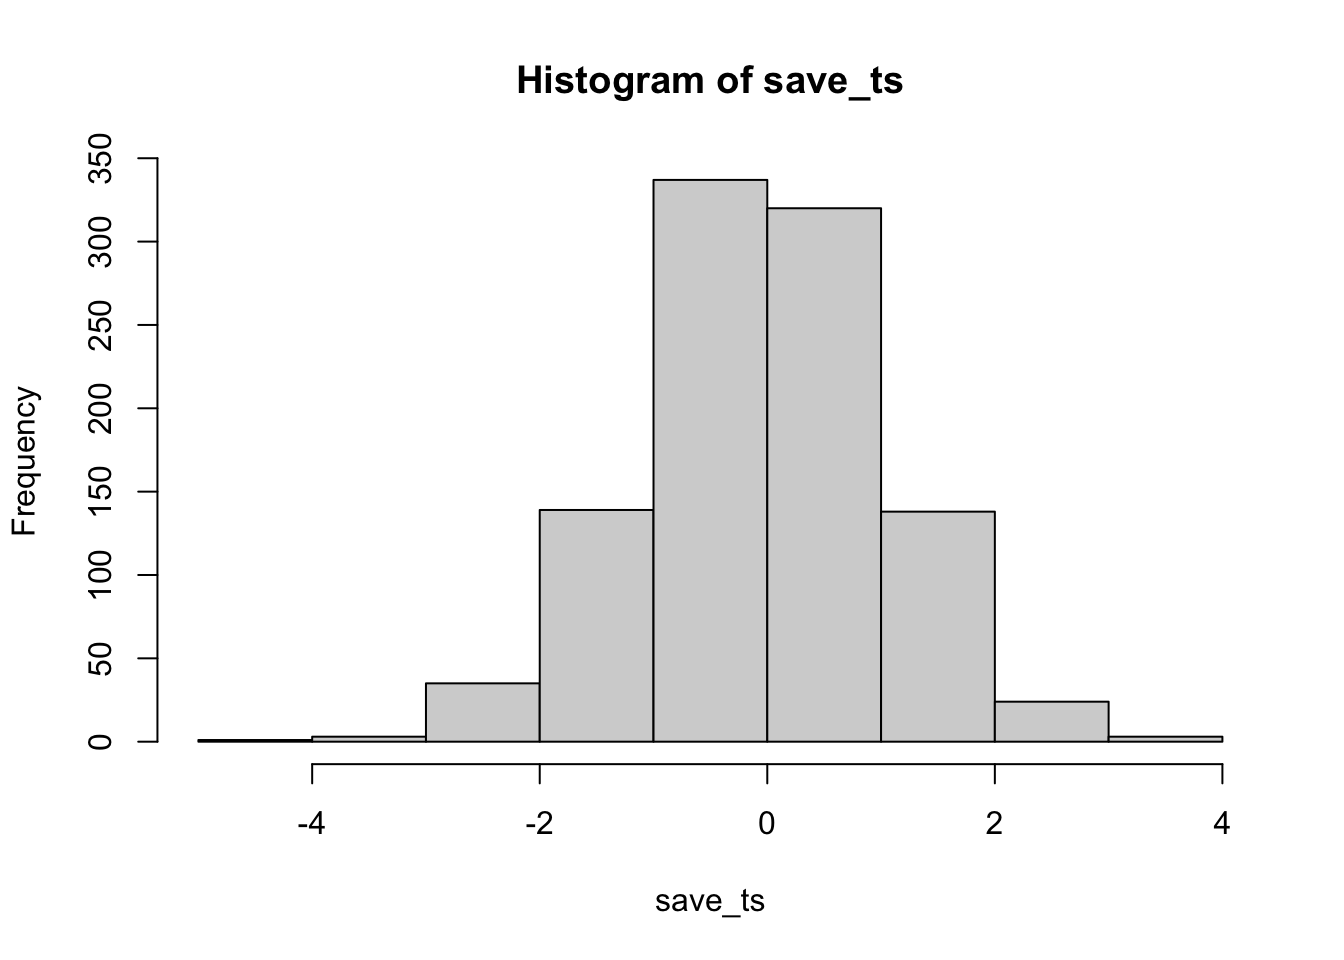
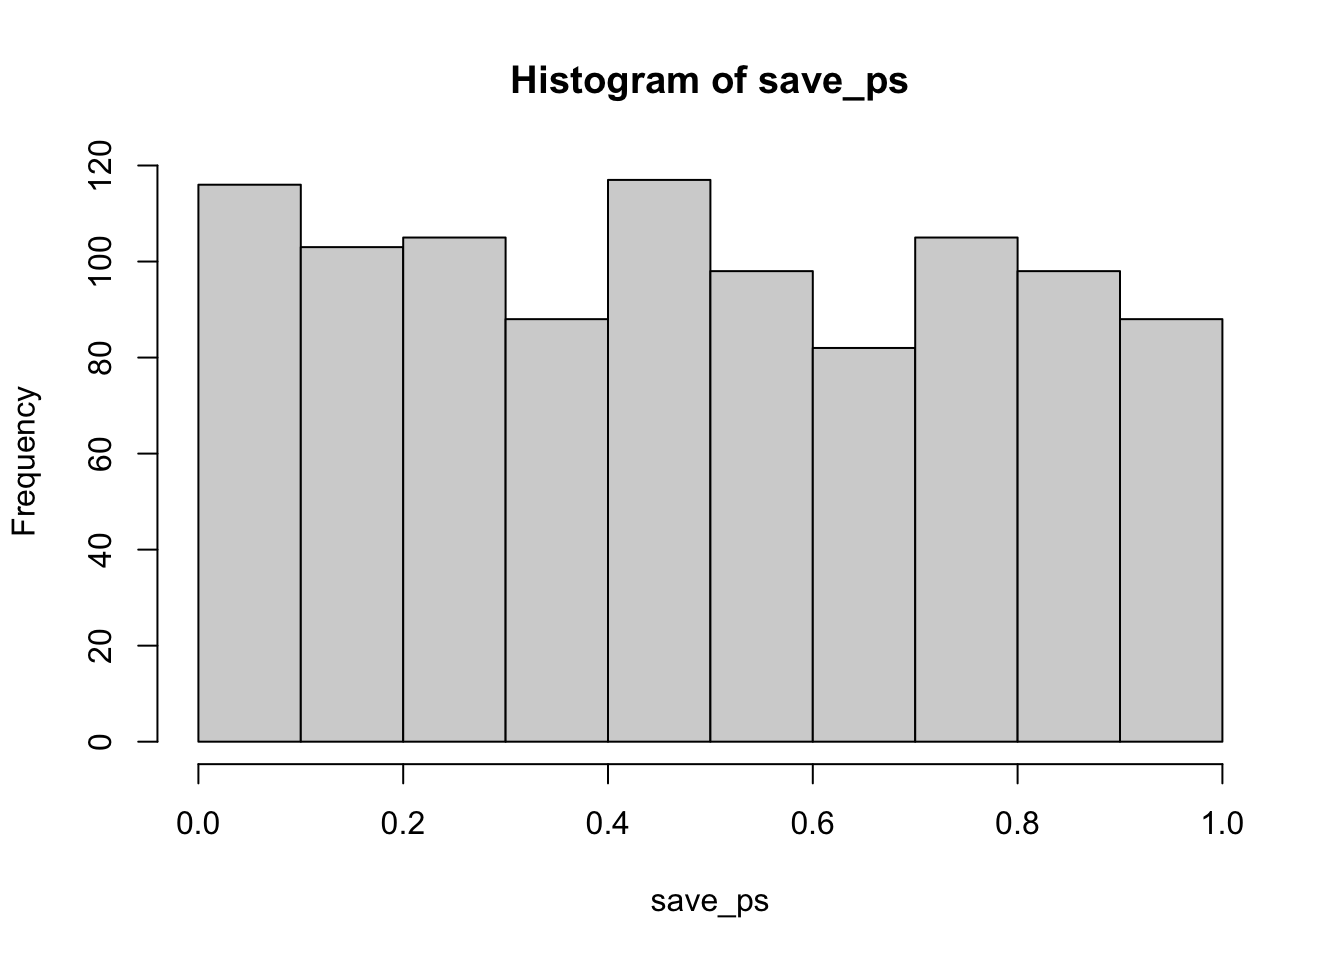
The simulated \(t\) distribution looks like a \(t\) distribution should, and it shows us how often we get \(t\) values of particular sizes. The \(p\)-distribution is flat under the null, which we are simulating here. This means you have the same chance of getting a \(t\) with a p-value between 0 and 0.05 as you would of getting one between .90 and .95. Those ranges are both ranges of 5%, so there are an equal amount of \(t\) values in them by definition.
You can write the same simulation more compactly with replicate() instead of a for loop; it produces the same two distributions above:
simulated_ts <- replicate(1000, t.test(rnorm(30, 50, 25), mu = 50)$statistic)
simulated_ps <- replicate(1000, t.test(rnorm(30, 50, 25), mu = 50)$p.value)
7.6.2 Simulating a paired samples t-test
The code below is set up to sample 10 scores for condition A and B from the same normal distribution. The simulation is conducted 1000 times, and the \(t\)s and \(p\)s are saved and plotted for each.
save_ps <- length(1000)
save_ts <- length(1000)
for ( i in 1:1000 ){
  condition_A <- rnorm(10,10,5)
  condition_B <- rnorm(10,10,5)
  differences <- condition_A - condition_B
  t_test <- t.test(differences, mu=0)
  save_ps[i] <- t_test$p.value
  save_ts[i] <- t_test$statistic
}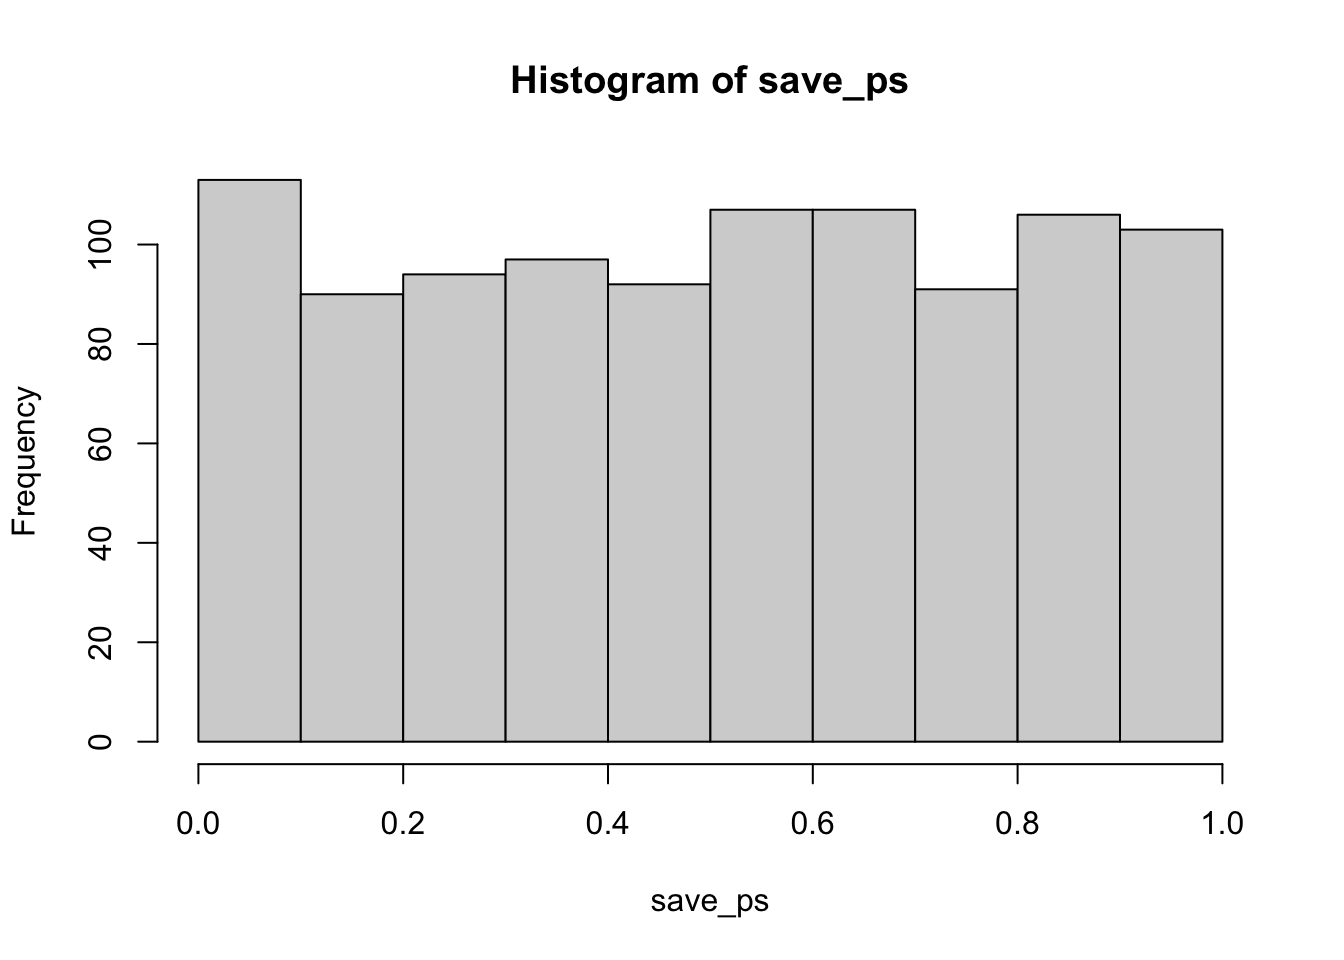
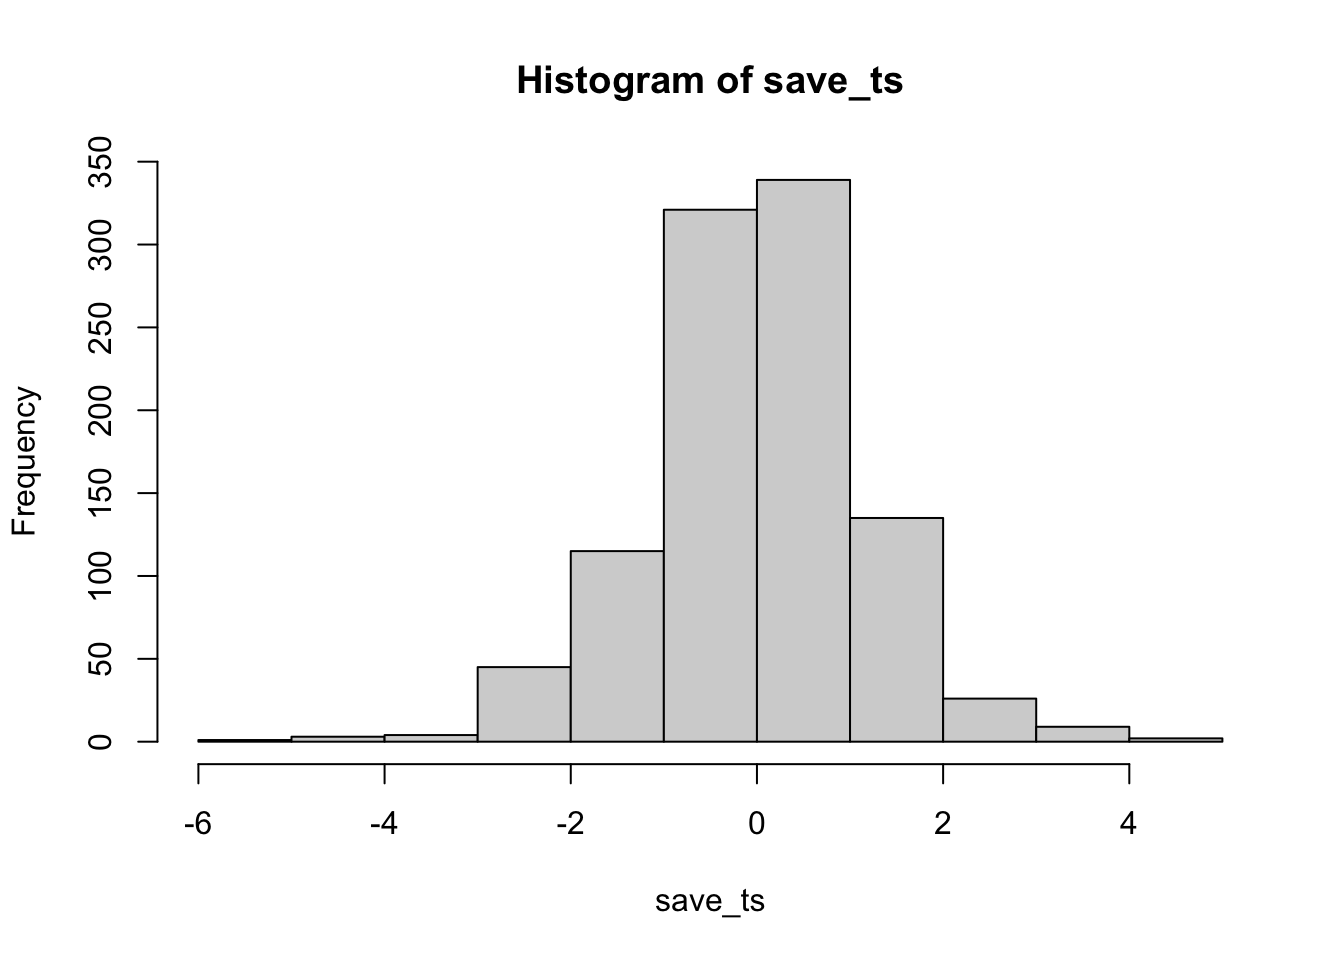
According to the simulation, when there are no differences between the conditions, and the samples are being pulled from the very same distribution, you get these two distributions for \(t\) and \(p\). These again show how the null distribution of no differences behaves.
For any of these simulations, if you rejected the null-hypothesis (that your difference was only due to chance), you would be making a type I error. If you set your alpha criteria to \(\alpha = .05\), we can ask how many type I errors were made in these 1000 simulations. The answer is:
length(save_ps[save_ps<.05])
#> [1] 51
length(save_ps[save_ps<.05])/1000
#> [1] 0.051
We happened to make 51 type I errors. The expectation over the long run is a 5% type I error rate (if your alpha is .05).
What happens if there actually is a difference in the simulated data, let’s set one condition to have a larger mean than the other:
save_ps <- length(1000)
save_ts <- length(1000)
for ( i in 1:1000 ){
  condition_A <- rnorm(10,10,5)
  condition_B <- rnorm(10,13,5)
  differences <- condition_A - condition_B
  t_test <- t.test(differences, mu=0)
  save_ps[i] <- t_test$p.value
  save_ts[i] <- t_test$statistic
}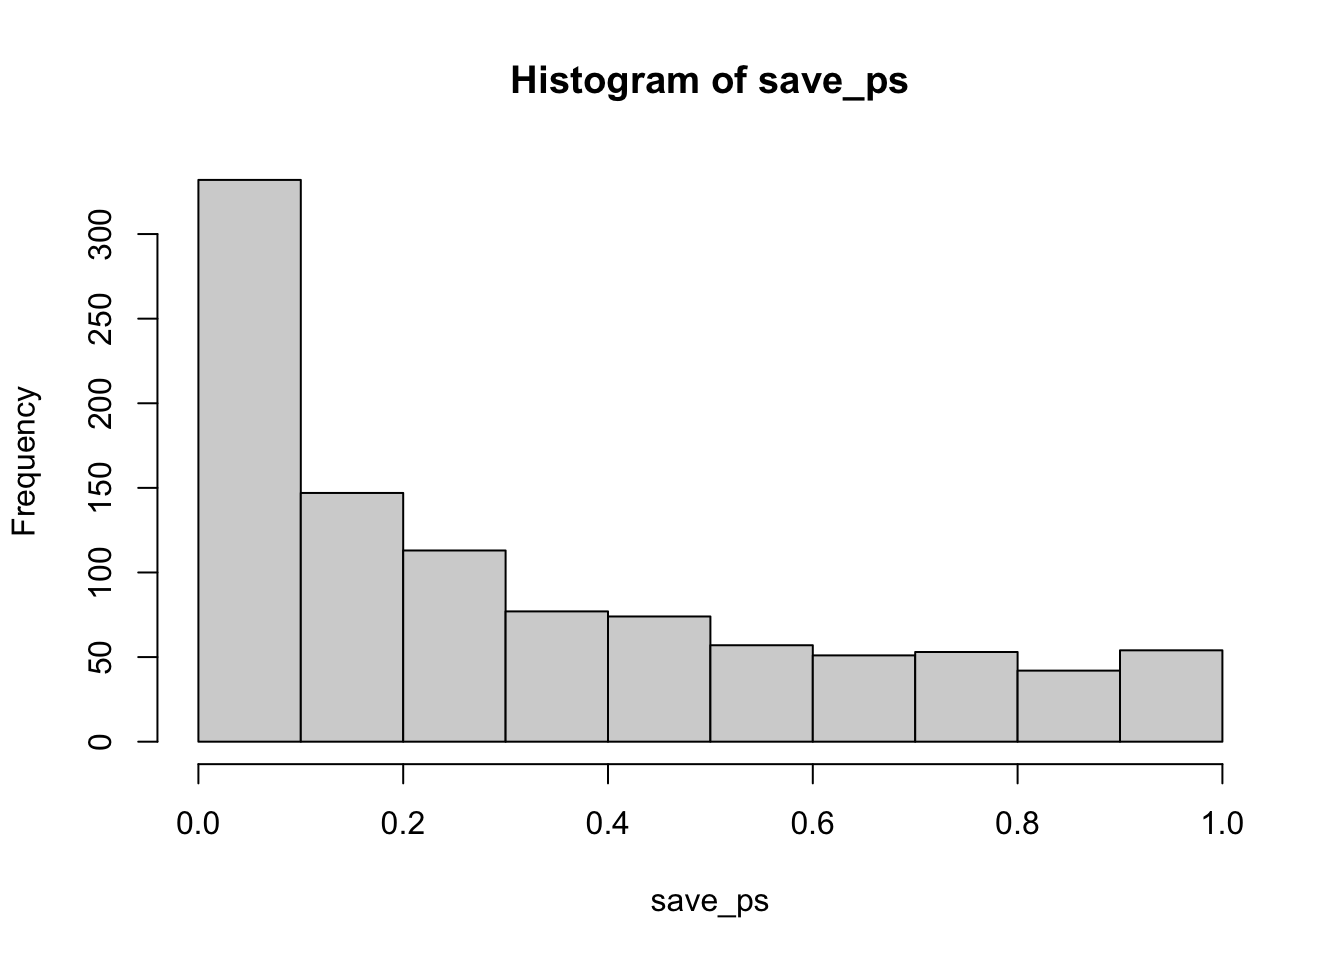
Now you can see that the \(p\)-value distribution is skewed to the left. This is because when there is a true effect, you will get p-values that are less than .05 more often. Or, rather, you get larger \(t\) values than you normally would if there were no differences.
In this case, we wouldn’t be making a type I error if we rejected the null when p was smaller than .05. How many times would we do that out of our 1000 experiments?
length(save_ps[save_ps<.05])
#> [1] 216
length(save_ps[save_ps<.05])/1000
#> [1] 0.216
We happened to get 216 simulations where p was less than .05, that’s only 0.216 of experiments. If you were the researcher, would you want to run an experiment that would be successful only 0.216 of the time? Probably not, that’s the case for designing a better experiment.
How would you run a better simulated experiment? Well, you could increase \(n\), the number of subjects in the experiment. Let’s increase \(n\) from 10 to 100, and see what happens to the number of “significant” simulated experiments.
save_ps <- length(1000)
save_ts <- length(1000)
for ( i in 1:1000 ){
  condition_A <- rnorm(100,10,5)
  condition_B <- rnorm(100,13,5)
  differences <- condition_A - condition_B
  t_test <- t.test(differences, mu=0)
  save_ps[i] <- t_test$p.value
  save_ts[i] <- t_test$statistic
}
#> [1] 990
#> [1] 0.99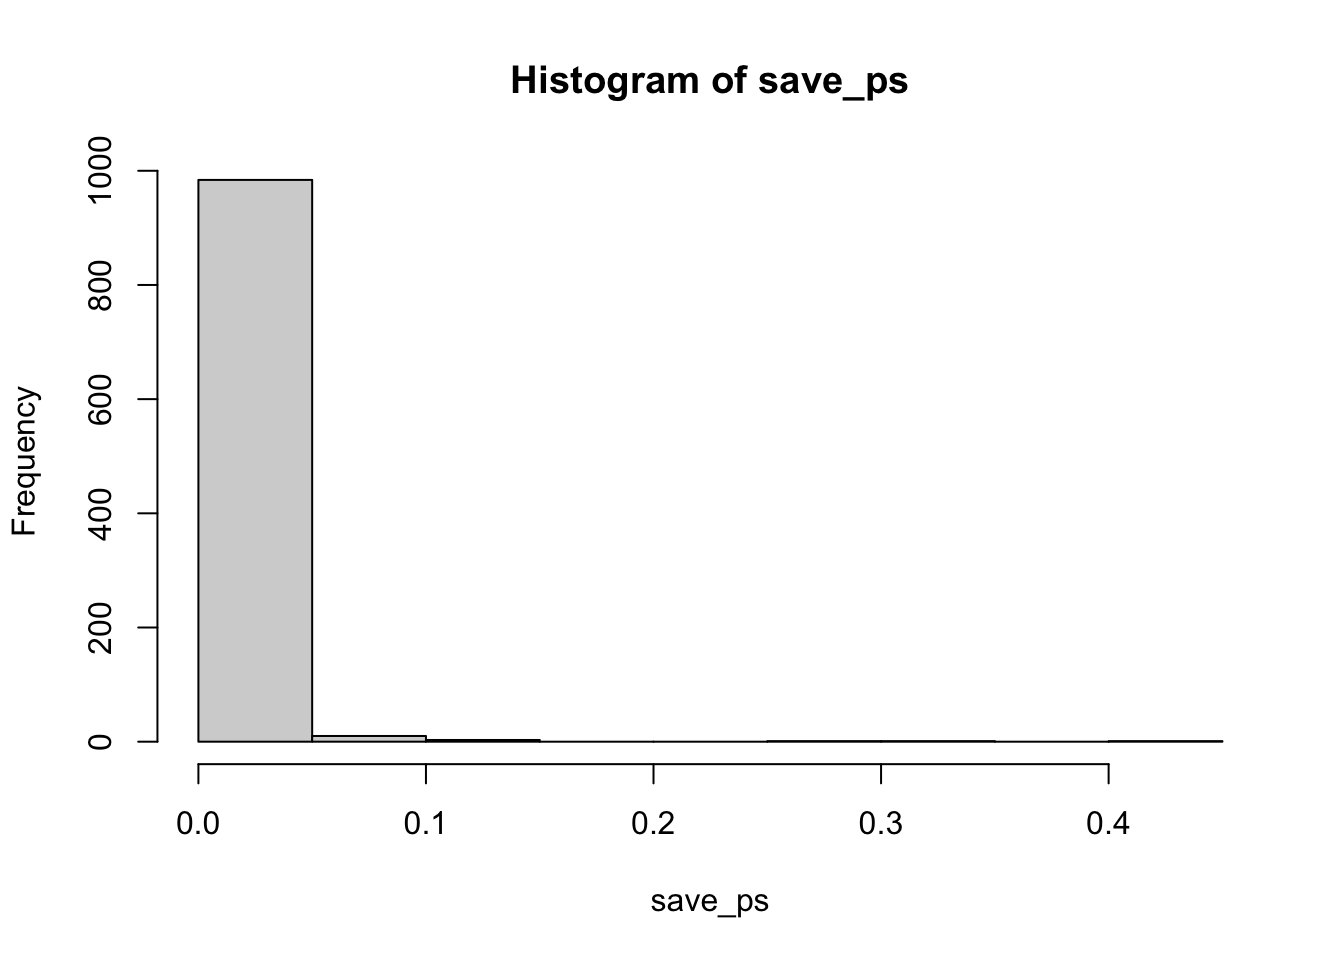
Now almost all of the experiments show a \(p\)-value of less than .05 (using a two-tailed test, the default in R). You can use this simulation process to determine how many subjects you need to reliably detect your effect.
7.6.3 Simulating an independent samples t-test
The setup is the same, you just change what goes into t.test(). Here’s the null case, assuming no difference between two independent groups of \(n=10\):
save_ps <- length(1000)
save_ts <- length(1000)
for ( i in 1:1000 ){
  group_A <- rnorm(10,10,5)
  group_B <- rnorm(10,10,5)
  t_test <- t.test(group_A, group_B, paired=FALSE, var.equal=TRUE)
  save_ps[i] <- t_test$p.value
  save_ts[i] <- t_test$statistic
}
#> [1] 51
#> [1] 0.051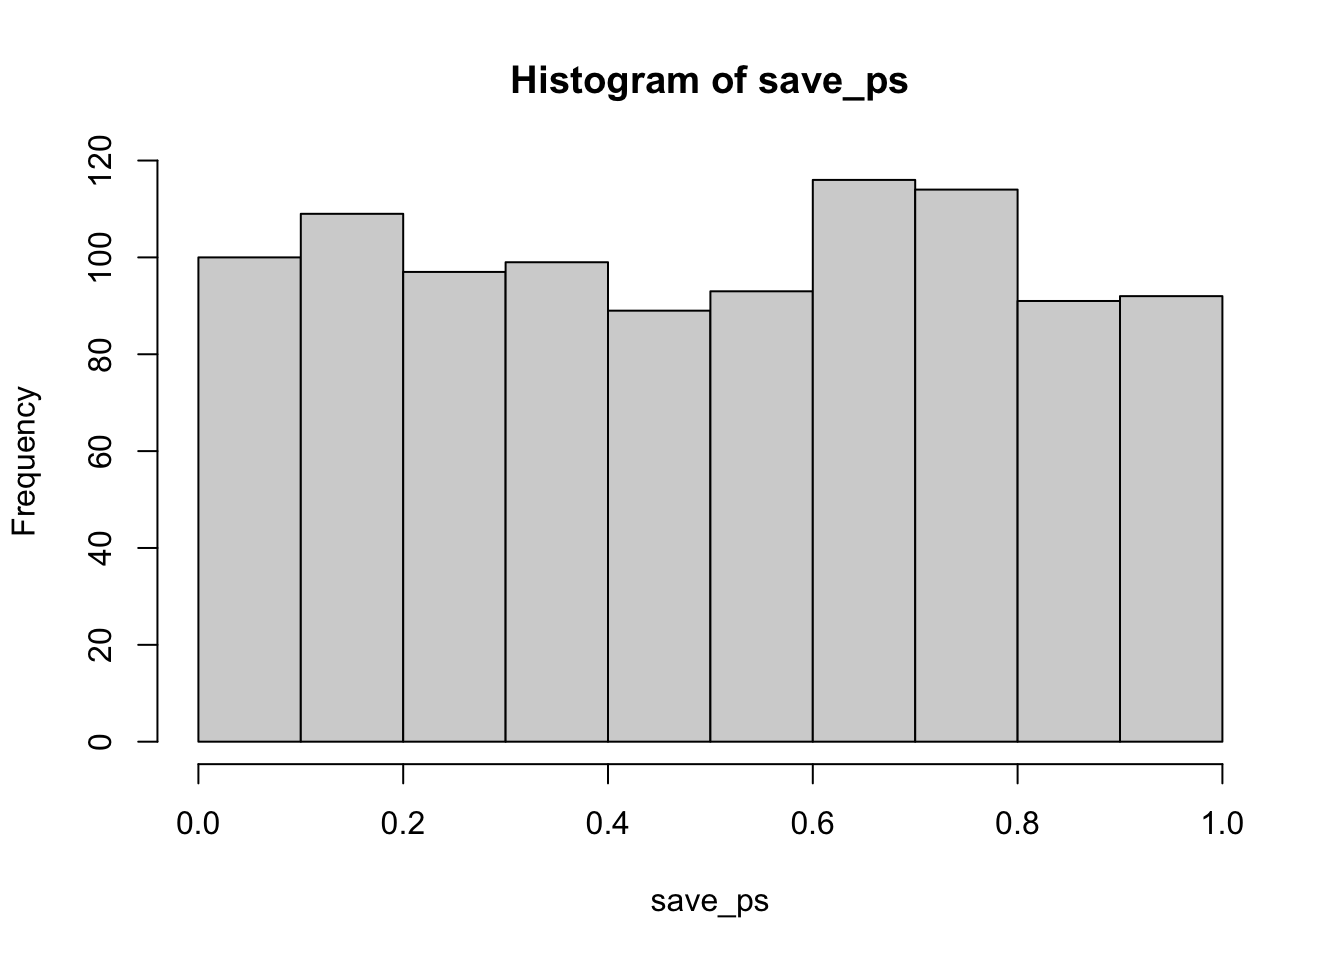
Same story as before: about 5% of these simulated experiments come out “significant” by chance alone. And the same two levers we saw for the paired test still apply here, giving group_A and group_B different means will pull power up, and so will increasing \(n\). Try editing the code above to see it for yourself.
7.7 Videos
7.7.1 One or Two tailed tests
Barnes, Mallory L. 2023. Statistics for Environmental Science.
Student, A. 1908. “The Probable Error of a Mean.” Biometrika 6: 1–2.